There are a few items that I still want to get for my studio to complete the set up. They are as follows:
1. another background light
2. hair light with snoot
3. black and brown muslin background
4. a few props (I recently purchased a scale to put a baby on).
5. white, balck pink and beighe shere and super sheer draping backgrounds.
6. photographers stool for two with arm rest
7. portrait lens (appx 50mm)
8. NIK software
This is just a wish list. As I update my studio I will send a new pictures so that you can see where it has been placed.

Monday, September 27, 2010
Sunday, September 26, 2010
Chicago Taylor Family
The first part of my weekend is over and it was great. My husbands brother and his family came to visit for the night and I was able to take some nice high key photos of "The Chicago Taylor Family." They were great subjects and were willing to sit for me until I got the shot that I wanted as well as play around with different poses.
The followings steps were taken for the photo shoot.
1. Ensured the lights were set to the proper output (key light @ f5.6, fill light @ f3.5, background light @f11)
2. Took a picture of the calibration target (grey card) to ensure that the white balance reading was correct.
3. Checked the histogram of the grey card picture to ensure that the exposures were correct.
4. SNAP, SNAP, SNAP!!!


The second part of my weekend fell through as the photographer I was going to shoot with had to change her schedule. Hopefully, we will be able to meet up soon to shoot together. I have a few other ideas for some shots of my son which I plan and post very soon.
Thursday, September 23, 2010
This weekend
I have family coming in tomorrow which means I have a few models and I can't wait. On Sunday, I may be going to a colleagues studio to have fun with various lighting techniques. This should be a fun filled learning weekend. Hopefully the next post will be of some great photos taken this weekend.
Sunday, September 19, 2010
A Princess' Photo Shoot (09/14/2010)
I finally finished editing the pictures from the princess who turned 3. I didn't have to do a lot of editing put I had to go through a lot of pictures as I took over 200 photos. Overall, I am pleased with the outcome and I am thankful for the opportunity to take pictures of such a beautiful little girl. Below are the pictures and a card that was made.
The below pictures were shot using high key lighting. This lighting scenario gives a clean and simple image and requires 4-5 lights (1 fill light, 1 key light, 1 hair light and 2 background lights). I was able to shoot these high key portraits using only one background light. The downfall of using one background light is that it is in the middle of the set up and can be seen in the picture if you don't have props to go in front. This is where photoshop comes in as I was able to photoshop the background light out of the final pictures when necessary.
I took the following steps when taking these pictures.
1. Set the lights up with a 3:1 ratio (f 5.6 : f3.5)where the key light is 3x more powerful than the fill light. The background light was set at f11 (at least two stops higher than the key light). I used a Sekonic light meter to ensure the lights were set up properly.
2. I used a photovision calibration target to ensure that I had a good white balance.
Finally, I had FUN, FUN, FUN taking pictures of the little Princess.


Thursday, September 16, 2010
Photoshoot 09/14/2010
I had the honor and privelege of photographing a beautiful 3 year old on 09/14/2010. She was a sweet photogenic girl. I am in the process of editing them and will post them as soon as I am done so please stay tuned.
Saturday, September 11, 2010
Natasha's Photo Shoot
First, I would like to apologize for not posting for the last few days....I've been running short on models.
I was able to take some pictures of a client (my best friend) outside and in my studio so that I could practice with natural as well as flash lighting.
The below pictures were taken in my backyard between 9:30am and 10:15am. The first thing I did was set my camera to custom white balance and take a picture of my grey card. Next, I used my light meter to get an accurate reading on the lighting. I took a few pictures using a diffuser and a few using a white reflector. Below are the pictures using the natural light.


Below are the pictures taken in my studio.


I was able to take some pictures of a client (my best friend) outside and in my studio so that I could practice with natural as well as flash lighting.
The below pictures were taken in my backyard between 9:30am and 10:15am. The first thing I did was set my camera to custom white balance and take a picture of my grey card. Next, I used my light meter to get an accurate reading on the lighting. I took a few pictures using a diffuser and a few using a white reflector. Below are the pictures using the natural light.


Sunday, September 5, 2010
Merritt Family Reunion 2010
I went to my family reunion in July 2010 and took a few pictures. I just had a chance to edit them and wanted to share them with you. Enjoy!
 |
| My brother and his wife (Curtis Jr. & Malene) |
 |
| My brother and his family (Corey, Curtis Jr., Malene & Curtis III) |
 |
| My cousin Madison |
Saturday, September 4, 2010
Evening Photos at Tribble Mill Park
After this morning I decided to go back out when the sun was going down and try to take some more pictures. I realized that until I get another hand to help when I am taking pictures of my kids I will not be able to use the reflectors I purchased on them. But, I think I still got a few good shots and above all the kids had a ton of fun climbing on the rocks and looking at the water. Most of the pictures are of Sidney because she is the most cooperative. My son just wants to run and climb and make faces.


AM Photoshoot with the kids
Good Day,
This morning I got out around 10am, before the sun was too high in the sky. I wanted to get out earlier but the kids weren't that cooperative.....but I take what I can get. For this photo shoot I used the silver reflector on the right side to fill in the shadows and the diffuser to soften the light. Both options give different results as you can see below. The goal of this photo shoot was to learn to see and control the light which is what makes a great exposed picture. Almost forgot....prior to taking the pictures I shot a grey card so that I could use the custom white balance feature on my camera. This ensures that the whites are whites and all other colors are true to their color.
I am going to try to go back out this evening with the kids when the sun is setting.
This morning I got out around 10am, before the sun was too high in the sky. I wanted to get out earlier but the kids weren't that cooperative.....but I take what I can get. For this photo shoot I used the silver reflector on the right side to fill in the shadows and the diffuser to soften the light. Both options give different results as you can see below. The goal of this photo shoot was to learn to see and control the light which is what makes a great exposed picture. Almost forgot....prior to taking the pictures I shot a grey card so that I could use the custom white balance feature on my camera. This ensures that the whites are whites and all other colors are true to their color.
 |
| Photos with diffuser |
 |
| Photos with silver reflector |
Friday, September 3, 2010
5 in 1 reflector
Today I decided to test out the Interfit reflector kit I recently purchased. This kit came with 5 different types of reflectors (silver, gold, black, white/transparent) . I decided to use natural light but with natural sunlight comes harsh directional light. In order to control the light and to get rid of the harsh lighting you can use a reflector or a diffuser. The reflector will reflect light into the shadows on the subject and the diffuser will soften the light. The reflector needs to be placed on the opposite side of the light source and the diffuser has to be place in between the subject and the light source. Today I only used the silver reflector. This picture was taken around 7pm when the sun was setting and therefore the light is coming from the right. My daughter doesn't stay still and therefore you cant see the light on her face but you can see it more on the back of her head (Picture 1). The picture with the reflector shows how the lighting on her face/back of her head is now more even (Picture 2).
 |
| Picture 1 Picture 2 |
Thursday, September 2, 2010
Wednesday, September 1, 2010
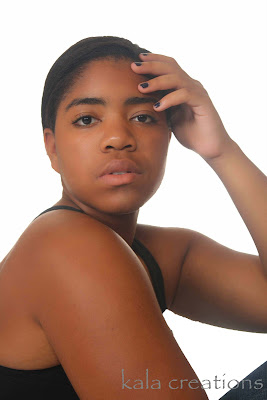
Profile Picture
Today, I had my husband take a picture of me for my profile. We started taking the pictures around 7pm because I wanted to get a beautiful golden glow. I am not sure we were able to do that successfully but I will definitely try again. If you position the sun behind a foreground you can also get a beautiful dramatic silhouette. So that is the goal for my next picture....
In the meantime, my husband loves his car (he calls it the Bat mobile) and he asked me to take a picture of him next to his car........Not sure if I should be jealous or worried.

In the meantime, my husband loves his car (he calls it the Bat mobile) and he asked me to take a picture of him next to his car........Not sure if I should be jealous or worried.
Subscribe to:
Posts (Atom)